It’s Halloween time, the spookiest season of the year! What better way to celebrate than by getting your crochet hooks ready and crafting some creepy and cute Halloween pieces? Whether you’re a seasoned crocheter or just starting out, creating a Halloween pumpkin is a fantastic project to add a festive touch to your home decor. So, grab your yarn and needles, and let your creativity flow as you crochet the perfect pumpkin to set the eerie mood for this spooky season!
Materials
- Crochet hook
- Scissors
- Fiberfill stuffing
- Stitch markers
- Sewing pins
- Tapestry needle, including a long one
- Orange yarn
- Dark green yarn
Abbreviations
- MR: magic ring
- st: stitch / stitches
- ch: chain / chains
- Rnd / Rnds: round / rounds
- sc: single crochet
- dec: decrease
- inc: increase
- 3sc-inc: triple increase, that is, make 3sc in the same stitch
- BLO: back loop only
- FLO: front loop only
- xN: repetitions
- [ ]: total of st in the round
Difficulty level
Easy/beginner level

Pattern
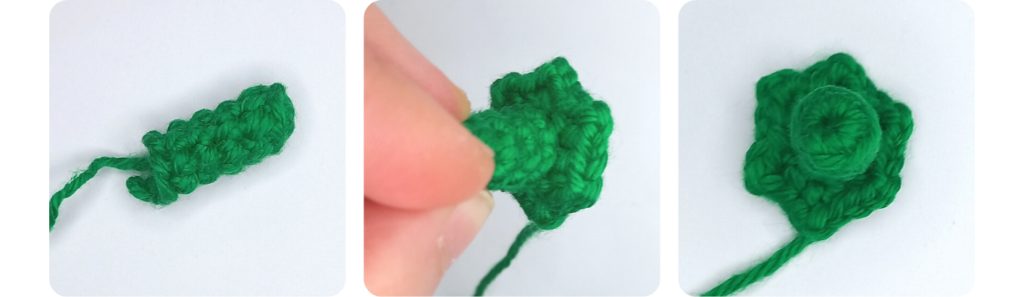
Pumpkin Stem
Dark green yarn
1) 6sc in a MR [6]
2) BLO: 6sc
3-5) 6sc – 3 rounds
6) BLO: (1sc, ch-1, 1sc in the same st) x 6 [18]
Fasten off; leave a yarn tail for sewing later on.
Pumpkin
Orange yarn
1) 6sc in a MR [6]
2) 6inc [12]
3) (1sc, 3sc-inc in BLO) x 6 [24]
4) 2sc, 1sc in BLO, (3sc, 1sc in BLO) x 5, 1sc [24]
5) 2sc, 3sc-inc in BLO, (3sc, 3sc-inc in BLO) x 5, 1sc [36]
6) 3sc, 1sc in BLO, (5sc, 1sc in BLO) x 5, 2sc [36]
7) 3sc, 3sc-inc in BLO, (5sc, 3sc-inc in BLO) x 5, 2sc [48]
8-18) 4sc, 1sc in BLO, (7sc, 1sc in BLO) x 5, 3sc [48] – 11 rounds
19) 2sc, 1dec, 1sc in BLO, (1dec, 3sc, 1dec, 1sc in BLO) x5, 1dec, 1sc [36]
20) 3sc, 1sc in BLO, (5sc, 1sc in BLO) x 5, 2sc [36]
21) 1sc, 1dec, 1sc in BLO, (1dec, 1sc, 1dec, 1sc in BLO) x 5, 1dec [24]
22) 2sc, 1sc in BLO, (3sc, 1sc in BLO) x 5, 1sc [24]
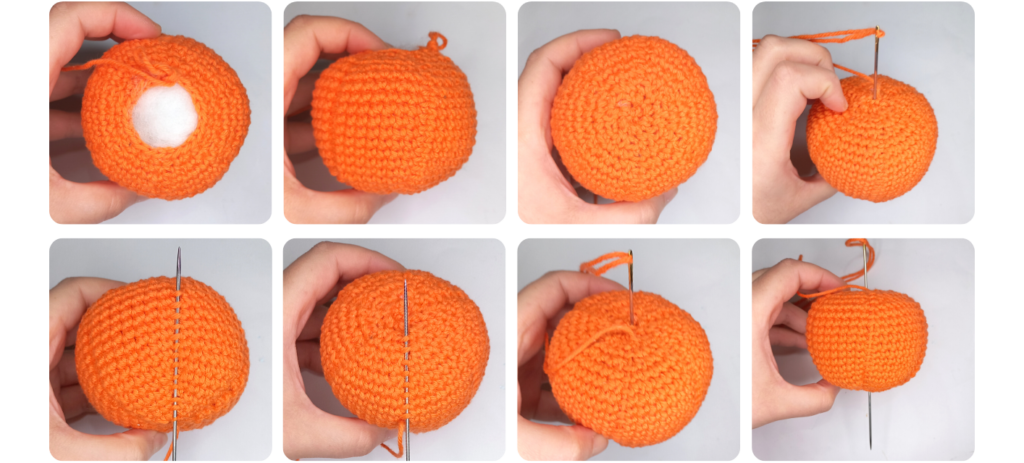
Stuff it as you go.
23) (1dec, 1dec in BLO) x 6 [12]
24) 6dec [6]
Make a reverse MR and fasten off, but leave a long tail. Use it to create the pumpkin’s segments:
- Using the tapestry needle, go through the middle of the pumpkin until the needle comes out from the bottom center;
- Pass the needle/yarn over the stitches in BLO — and under the stitches in FLO;
- Guide the needle to the top center of the pumpkin, insert it into the amigurumi until it comes out from the bottom center again;
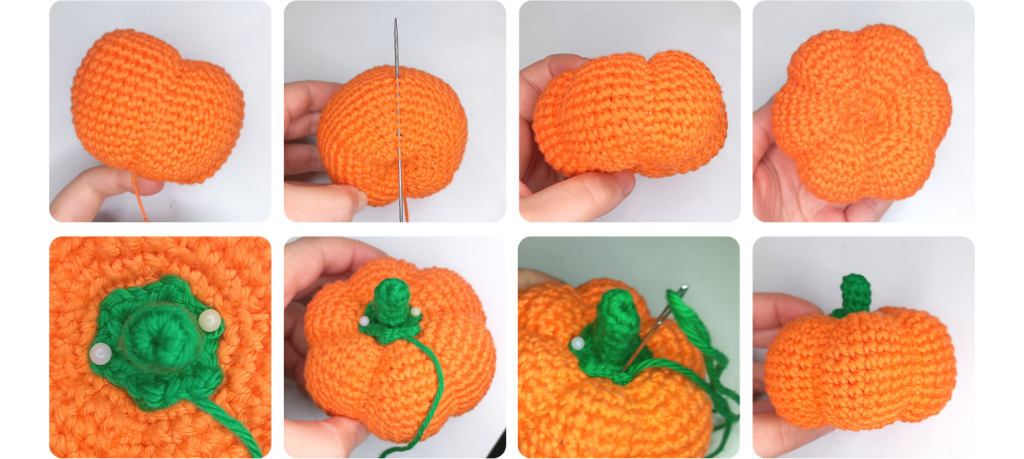
- Pull the yarn tight to define the segment;
- Repeat the process so that all the six segments are pretty defined.
When finished, fasten off and sew the stem to the top of the pumpkin.